
Vectorization for Jewelry Engraving
Technical Requirements for Precise, Error-Free Machining
From Screen to Metal
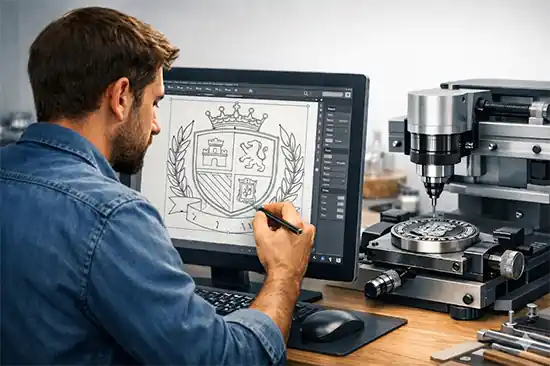
To turn a digital drawing into an actual engraving on gold or silver, the starting point is understanding that machines do not see images; they follow mathematical paths. When creating vector artwork for jewelry engraving, you are not designing an image to be printed with ink, but rather a detailed roadmap for a physical tool, such as a laser beam or a diamond engraving bit. The key to success lies in learning how to connect the lines on the screen with the limitations and requirements of the real world.
The Digital Canvas: Golden Rules for Clean Paths
One of the most common mistakes beginners make is relying too heavily on the software's automatic tracing feature to convert an image into a vector. This can generate thousands of unnecessary points and duplicate lines that interfere with the engraving machine's ability to interpret the design. For jewelry engraving, tracing should always be done manually, carefully drawing the paths with the Pen Tool. The fundamental rule here is that less is more: the fewer anchor points used to define a curve, the smoother the machine's movement and the cleaner the finish on the metal. Too many points can cause the motors to make tiny stops and starts, resulting in a rough engraving and imperfections on the finished piece.
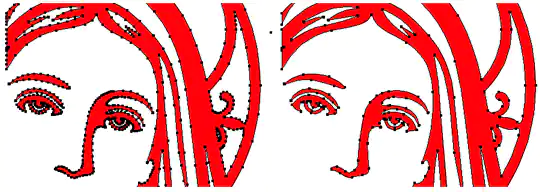
Another essential technical requirement is ensuring that all contours are completely closed. In traditional printing, an open path may still look perfectly fine, but in jewelry engraving software, if a shape has open endpoints, the machine may not know where the boundary of the area begins and ends. Similarly, it is essential to use merging tools (such as the Pathfinder panel) to eliminate any intersecting or overlapping lines. If two vectors cross on the same plane, the physical tool will pass over the exact same coordinates twice, potentially piercing, deforming, or weakening the precious metal piece.
Actual Line Thickness: The Challenge of the Physical World
One of the biggest surprises when processing these files is discovering that the line thickness applied in design software does not exist in the physical world of machines. If you draw a line and increase its stroke weight on screen to make it look bold, the engraving machine will ignore that thickness and make just one pass, producing an extremely fine mark. If you want text or a logo to have actual thickness in the metal, you should always use the Expand Stroke function. This converts the line into a hollow geometric shape, creating a closed contour with an inner area that the machine can then recognize and engrave.
Specialized Equipment for Vector Engraving in Jewelry
1. Fiber and CO2 Laser Systems
Laser machines, especially fiber lasers, are now the industry standard in jewelry manufacturing. Unlike other methods, fiber lasers can process precious metals such as gold, silver, and platinum.
How they work: The machine reads the vector file (in .ai, .eps, .dxf, or .svg format), and the laser beam follows the vector coordinates to remove material through ablation, producing anything from deep markings to detailed surface engravings.
Advantages: They can reproduce complex logos, text using custom fonts, and intricate geometric patterns that would be impossible to create manually. Their micrometer-level precision is essential for small jewelry pieces.
2. CNC Milling Machines for Jewelry
Although lasers dominate the field of marking, CNC milling machines remain essential when deep grooves or physical relief (such as bas-relief) are required.
How they work: These machines use a cutting tool (a milling cutter or diamond-tipped bit) that follows the vector design. CAM (Computer-Aided Manufacturing) software converts the vector into a toolpath, which tells the machine the cutting depth and angle.
Applications: They are ideal for engraving the inside of rings, creating medallions with clearly defined relief, and manufacturing jewelry molds.
3. Computerized Diamond-Tip Pantographs
These machines are modern, automated versions of traditional manual pantographs. They are highly valued by artisan jewelers because the engraving process does not involve heat, preserving the integrity of the metal.
How they work: They use a diamond tip that scratches or marks the metal by following the exact path defined by the vector drawing. This is a form of impact or drag engraving.
Applications: They are frequently used for quick in-store personalization, such as engraving names on ID bracelets or dates inside rings, producing a bright, durable finish.
Technical Requirements for Vector Files
For these machines to operate correctly, the artwork must be clean. This means:
- Closed paths: All paths must be closed, with no overlapping anchor points.
- Simplification: Avoid unnecessary anchor points that could slow down the machine controller's processing.
- Scaling: Because they are vectors, designs can be resized down to the millimeter without pixelating their edges, allowing the same motif to be adapted to different jewelry sizes.
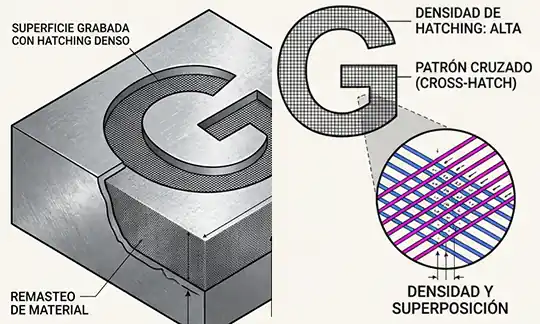
When working with a fiber laser and engraving solid surfaces or bold lettering, the workshop software applies a dense internal hatching process (known as hatching). The laser follows these parallel micro-lines at full speed to perform a continuous sweep that burns the metal evenly, achieving a striking matte or contrasted finish at the microscale. Conversely, when using a diamond drag engraver, the approach changes completely. This tool is inefficient at filling areas; it prefers a single line stroke. Therefore, designs must use clean single-line fonts and artwork, allowing the diamond tip to pass just once, leaving a fine, clean, and brilliant groove.
The challenge becomes even more physical when moving to CNC milling machines. Here, the vector design must be fully adapted to the actual thickness of the tool bit used in the workshop, calculating a safety margin (offset) equivalent to its radius. When designing, it is mandatory to leave channels and safety spaces wider than the bit's diameter. If details are drawn too small or narrow, the physical bit simply won't fit into that space, and the machine will make one of two choices: either ignore that part of the design and erase the detail, or pass right over it, destroying the metal walls of the piece.
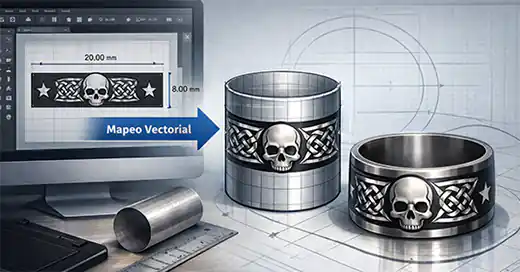
Added to all this is the challenge of designing for three-dimensional, curved surfaces, such as the inside or outside of a ring. On the computer screen, the design is created flat, but the actual metal is cylindrical. To solve this, a technique called vector mapping or wrapping is used, which digitally wraps the flat drawing around a virtual cylinder mimicking the exact measurements of the band. The program mathematically calculates the curvature so that, when engraved, the design looks perfectly proportioned and doesn't end up stretched, flattened, or distorted. Furthermore, in the physical workshop, the machine will use an accessory motor called a rotary axis, which rotates the ring millimeter by millimeter in a synchronized manner while the laser or tip executes the vector stroke.
Final Preparation: The Pre-Engraving Checklist
Before sending any file to the workshop, it is essential to perform a final visual inspection by activating the wireframe view mode in the design software. This screen fades colors and cosmetic line weights, allowing you to see the true skeleton of the vector and detect ghost lines, duplicate strokes, or text that you forgot to convert to curves. Remember that all text must be converted to outlines so the typography doesn't shift or get distorted when opened on the machine's computer.
Finally, work should always be organized using clean layers and assigning pure colors to the lines (such as red for areas to be cut completely through and black for those to be only surface-engraved). When saving, avoid modern formats that older workshop programs cannot process. Exporting the design into universal formats (such as .dxf or .plt) or saving the native file in older versions (such as Illustrator 8 or 10) will ensure the vector is read flawlessly, guaranteeing impeccable series production, maximum savings of precious metal, and perfect symmetry in every piece of jewelry.
Jewelry Vectorization Software
The choice of software for the jewelry sector depends on whether the goal is 2D artistic design or 3D technical modeling. Below are the most effective tools for converting designs into vector formats compatible with engraving machines.
Vector and Technical Design Software
These applications allow for the generation of clean paths and precise nodes, which are essential for the proper interpretation of designs by lasers or milling machines.
- Adobe Illustrator: Industry standard for logos and patterns. Its Image Trace feature is ideal for transforming sketches into vector files ready for export to .dxf or .svg.
- Affinity Designer: An excellent alternative with great fluidity, extremely precise node control, and a single-payment model, facilitating export to formats compatible with laser and CNC systems.
- CorelDRAW: Widely used in jewelry for its ease in managing laser cutting and its optimized tools for vectorizing bitmaps.
- Inkscape: A very robust free software option for independent professionals, allowing detailed node editing and export in standard formats (.svg, .dxf).
3D Modeling Programs with Vector Capabilities
Since jewelry engraving is often applied to three-dimensional pieces, it is necessary to have tools that allow vector profiles to be extracted from 3D models.
- RhinoGold / MatrixGold: Professional benchmarks in the sector, they allow profile curves (vectors) to be generated from complex surfaces, perfect for engraving the interior or exterior of rings and pieces.
- Autodesk AutoCAD: Focused on the technical side, ideal for geometric layouts with high micrometric precision.
The Vector as the Engine of Contemporary Jewelry
The integration of vector processes has transformed production methods in contemporary jewelry for several technical reasons:
- Material optimization: By automating toolpaths with mathematical precision, scrap metal (the waste of precious metals like gold or silver) is minimized during the engraving process.
- Quality standardization: A vector file allows the same engraving to be repeated with identical geometric precision indefinitely, eliminating the human error factor in series production.
- Reduced personalization times: The process of adapting a design to a client's requests is streamlined, making it possible to go from digital sketch to metal engraving in a matter of minutes.
The content of this site is protected by copyright. Excerpts may be quoted provided the original source is linked. Full reproduction without permission is not authorized.